Introduction to DIY Drawer Organizers
Transforming chaotic drawers into tidy spaces is easy with DIY drawer organizers. If you struggle to find items in your drawers or simply dread the mess, homemade dividers can offer a custom solution without breaking the bank. With DIY methods, you can tailor each organizer to fit your specific needs, from kitchen utensils to office supplies. Plus, creating your own drawer dividers can be a fun and rewarding project. Let’s dive into the process of making your own effective drawer organization system, where everything has a place and clutter becomes a thing of the past.
Assessing Drawer Space and Needs
When tackling drawer disorganization, the first step is to assess the actual space and identify your storage needs. Measure the length, width, and depth of your drawer to know exactly what dimensions to work with. This step ensures your DIY drawer organizer will fit snugly and effectively use the available space.
Identifying Commonly Used Items
Next, consider the items you use most frequently and ensure they’re easily accessible. Sort through the contents of your drawer and group like items together. This categorization will guide the design of your dividers, enabling you to allocate space efficiently.
Planning Your Custom Organization Layout
With your items sorted, sketch a layout of how you would like them to be organized within the drawer. Your plan should focus on maximizing space while allowing for quick retrieval of items. This might involve creating larger sections for bulkier items and smaller compartments for those easily lost trinkets.
Visualizing the End Result
Envision the final organized state of your drawer. This vision will serve as motivation and direction as you move on to selecting materials and building your custom drawer organizer. The goal is maintaining order while simplifying your daily routine through improved organization.
Benefits of a Clear System
A well-organized drawer saves time and frustration. It also prevents damage to your items by reducing clutter and ensuring everything has a dedicated place. Assessing your drawer space and needs is the cornerstone for creating a functional and long-lasting drawer organization system.
Materials and Tools Required
To create your custom DIY drawer organizer, you’ll need some basic materials and tools. The specific items will depend on the size and number of organizers you’re planning to make, but here’s a general list to get you started:
- Measuring Tape: Essential for accurately measuring the interior dimensions of your drawers.
- Cardboard or Sturdy Craft Board: This acts as the primary material for your dividers. Choose a thickness that is durable but not too bulky for the drawer space.
- Utility Knife or Scissors: Required for cutting the cardboard or craft board to size. A utility knife is preferable for cleaner, straight cuts.
- Straightedge or Ruler: Helps ensure that your cuts are straight and precise.
- Pencil or Marker: To mark where you need to cut. Opt for a pencil if you wish to make adjustments or avoid permanent marks.
- Glue or Double-Sided Tape: Select a strong adhesive that will hold the dividers together effectively.
- Graph Paper (Optional): Useful for planning the layout of your dividers and can act as a guide for cuts.
- Sandpaper (Optional): If you’re using craft board and it splinters while cutting, sandpaper can smooth rough edges.
Always prioritize safety while using sharp tools, and consider the durability of your materials to ensure the longevity of your drawer organizers. With everything gathered, you’re now set to create a customized and clutter-free drawer!
Step-by-Step Guide to Creating Your Custom Organizer
Creating your own drawer organizer is both rewarding and practical. Follow this easy guide to turn cluttered drawers into neatly organized spaces:
- Measure Your Drawer: Start by recording the length, width, and depth. This will determine the size of your dividers.
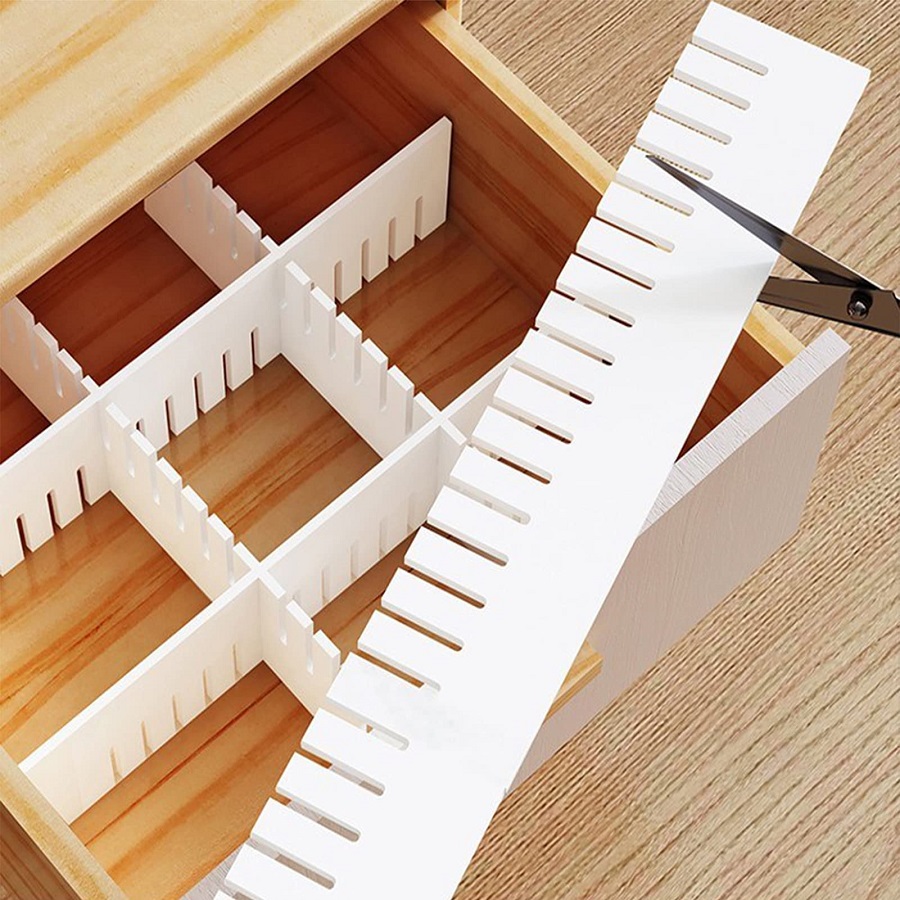
- Cut Your Materials: Use a utility knife or scissors and a straight edge to cut your cardboard or craft board to match your measurements.
- Lay Out Your Design: Arrange the cut pieces inside the drawer to mimic your planned layout. Make adjustments as needed.
- Mark the Spots: With the pieces laid out, use a pencil to mark where they will fit. This will guide your assembly.
- Assemble Dividers: Apply glue or double-sided tape to the edges that will connect. Press firmly to secure.
- Test the Fit: Before finalizing, place the divider framework back into the drawer to ensure a snug fit.
- Install in Drawer: Once you’re happy with the fit and design, set the organizer into the drawer.
- Organize Your Items: Place your items into their new sections and enjoy an organized drawer!
With a functional DIY drawer organizer, you’ll have a place for everything, making daily tasks and retrieval easier.
Securing and Installing Your Drawer Dividers
Once you have created the perfect layout and assembled your drawer dividers, it’s essential to secure them properly to maintain the organization. Here is how to install your DIY drawer dividers to ensure they stay in place and keep your items neatly sorted:
- Check the Fit: Before securing, place the dividers into the drawer to ensure they fit well.
- Apply Adhesive: Use a strong glue, adhesive tape, or silicone caulk to the ends of each divider that touch the drawer sides. This will anchor them in place.
- Press Firmly: Position the dividers back in the drawer and apply pressure where the adhesive is to bond them to the drawer interior.
- Allow to Dry: Wait for the adhesive to fully dry. Check your product’s instructions for drying times.
- Load Your Items: Once the dividers are secure, reorganize your items. Heavier items should go in first to give additional support to the dividers.
- Adjust as Needed: If you find that some items don’t fit as planned, don’t be afraid to adjust the dividers. The beauty of DIY is that you can always tweak your design.
Securing your dividers is a crucial step in the DIY process as it prevents shifting and keeps everything in its dedicated compartment. With your new drawer organization system in place, you’ll have a much more efficient and stress-free storage solution.
Alternative Methods for Non-Crafters
Not everyone has the time or tools for a DIY project, but that doesn’t mean a well-organized drawer is out of reach. Here are some hassle-free alternatives for non-crafters to achieve drawer nirvana without crafting:
Purchase Pre-Made Drawer Organizers
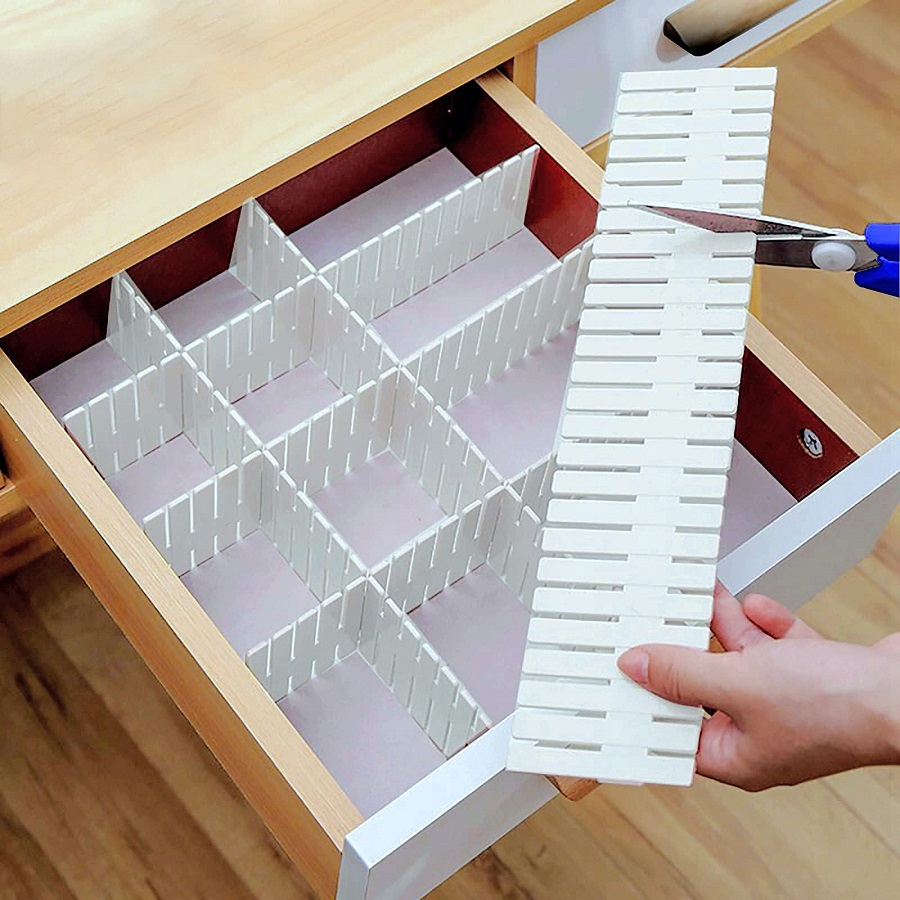
The market offers a wide range of ready-made drawer dividers that require no tools or construction. Look for adjustable or modular options that fit your drawer dimensions and organizing needs.
Utilize Everyday Household Items
You might be surprised at how items such as small boxes, egg cartons, or ice cube trays can serve as makeshift drawer organizers. Just place them in your drawers and sort smaller items into the compartments.
Invest in Drawer Liners and Non-Slip Mats
Sometimes, simply lining your drawers with non-slip matting or pretty paper can prevent items from sliding around. It’s a quick fix that adds a touch of personal style.
Take Advantage of Velcro Strips
If you need a temporary and adjustable solution, attach Velcro strips to the bottom of lightweight trays or dishes and correspond them to strips in the drawer. This way, you can rearrange as needed without permanent alterations.
Stackable Bins and Baskets
Stackable bins and baskets come in various sizes, making them a flexible solution for organizing without the need to measure and cut materials.
Consider Fabric Organizers
Fabric drawer organizers with multiple compartments can be ideal for clothing or accessory drawers, and they easily fold away when not in use.
Opt for Magnetic Strips for Tools and Utensils
For drawers storing metal tools or utensils, a simple magnetic strip attached to the inside of the drawer can hold items in place and save space.
Even if crafting isn’t your forte, there are many ways to achieve a clutter-free drawer. With these alternatives, organizing your drawers can still be accessible, affordable, and creative.
Maintenance and Upkeep Tips
Maintaining an organized drawer with your DIY organizer involves regular checks and minor tweaks. Here are simple tips to keep your drawers in top condition:
- Regular Cleaning:
Perform monthly cleanings to remove crumbs or debris. Empty the drawer and wipe down the dividers with a damp cloth.
- Reassess and Adjust:
Occasionally reevaluate your stored items. Remove things you no longer use and adjust the dividers as necessary.
- Check for Wear and Tear:
Inspect your dividers for any signs of wear. A touch-up with glue or replacement may be needed for any damaged sections.
- Organize Routinely:
After use, promptly return items to their designated spots. This habit prevents clutter from creeping back in.
- Label Sections:
Consider labeling compartments, especially in shared drawers, to maintain order and guide others in returning items to the right place.
- Protect Fragile Items:
Use soft liners or felt in sections housing delicate items to prevent scratches and damage.
By following these tips, your DIY drawer organizer will continue to serve you efficiently, keeping your drawers tidy and your items easily accessible. Regular maintenance is key to long-lasting organization.
Final Thoughts and Additional Organization Tips for Drawers
Organizing your drawers with a DIY organizer not only enhances functionality but also instills a sense of personal achievement. As you conclude your drawer organization project, remember that the key to enduring tidiness is adaptability and routine maintenance.
Embrace Flexibility
Your storage needs may change over time, so design your DIY drawer organizer with flexibility in mind. Opt for an adjustable layout that can accommodate new items or shifting priorities. You may wish to invest in modular systems that allow for such versatility.
Establish a Routine
To preserve the pristine condition of your organized drawers, establish a regular cleaning routine. Whether it’s a weekly or monthly tidying up, staying consistent will ensure your drawers remain clutter-free. Use this time to sort any misplaced items and appreciate the order you’ve created.
Involve Household Members
If you share your living space, involve your household members in the organization process. Explain your system and the location of items, and encourage everyone to maintain the drawer’s order. Collective responsibility will ensure your efforts are lasting.
Continual Improvement
Keep an eye out for new ideas and tools that may further refine your drawer organization. From the latest gadgets to simple hacks, the world of DIY offers endless possibilities for improvement. Embrace the journey of continual refinement.
By implementing these additional tips, you’ll ensure that your DIY efforts lead to a more organized, efficient, and happy living space. Just remember, no system is perfect from the start—it evolves with time, just like our lives.